available::available("helper")3 Creating the package infrastructure
A package starts life as a directory with some files and subdirectories that R expects. There is nothing to stop you building the whole thing from scratch. But it is so much easier to get some help from usethis.
The create_package function takes the path of the project you want to write, creates this directory, add adds some files and subdirectories.
The name of the directory will become the name of the package. Choose carefully as it is easier to get it right now than change it later. There are special rules for naming packages
- Contain only ASCII letters, numbers, and ‘.’
- Have at least two characters
- Start with a letter
- Not end with ‘.’
Try to avoid name clashes with existing packages, especially those on CRAN. The function available::available() can tell you if your name is valid and if it clashes with an existing package.
Once you have chosen your name, you can create the skeleton of your package. You can either use usethis::create_package(path = "path/to/package") or the RStudio menu File -> New Project -> New Directory -> R Package.
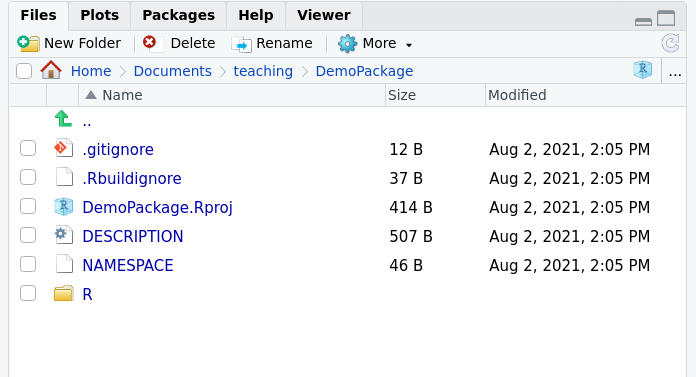
When you run this, it will open a new RStudio session. The files tab should look something like this.

usethis::create_package
-
.gitignore- which files should git ignore -
.Rbuildignore- When R builds a package, it does not like unexpected files..Rbuildignoretells it which ones it should ignore. -
DemoPackage.Rproj- an Rstudio project -
DESCRIPTION- metadata about the package -
NAMESPACE- Which functions are to be imported/exported. It is automatically generated so don’t edit this file by hand, but delete it if it becomes corrupt. -
R- a folder for your R code
Almost everything concerned with setting up a package is easier with the usethis package. We are going to be using this package a lot, so you might want to load it now.
When writing a package you will use a lot of functions from the usethis and devtools packages. These should NOT be written in files that form part of your package as re-running them (which could happen automatically when you build your package) could delete all your work.
Either run them directly in the console, or if you want to record them for future use, write them in the file that is it outside of the package, or add the file to the .Rbuildingnore file.
3.1 DESCRIPTION file
The DESCRIPTION file contains the information used by CRAN to make the package page there (see for example devtools).
Start by editing the title, author and description fields of the DESCRIPTION files. The title field must be in title case (they really do check this when you submit to CRAN).
Package: DemoPackage
Title: What the Package Does (One Line, Title Case)
Version: 0.0.0.9000
Authors@R:
    person(given = "First",
           family = "Last",
           role = c("aut", "cre"),
           email = "first.last@example.com",
           comment = c(ORCID = "YOUR-ORCID-ID"))
Description: What the package does (one paragraph).
License: `use_mit_license()`, `use_gpl3_license()` or friends to pick a
    license
Encoding: UTF-8
LazyData: true
Roxygen: list(markdown = TRUE)
RoxygenNote: 7.1.1
When you have finished, be sure to save the file otherwise your changes will be over-written.
3.2 Choose a licence
You need to set a licence for your package otherwise, legally, no-one will be allowed to make a copy and use it.
Frequently used open source licences for R packages are
-
MIT licence is a permissive licence, letting people do almost anything (including use, copy, modify, merge, publish, distribute, sublicense, or sell) with the software. Generate with
usethis::use_mit_license() -
GPL licence lets people do almost anything except distributing closed source versions. Generate with
usethis::use_gpl_license()
I generally use the MIT licence. Data packages probably should use a CC0 licence.
For more information about licences, see the R package book and Choose a License
3.3 git and GitHub
You don’t have to use git and GitHub when writing a package, but there are many advantages if you are do.
You are probably aware of some of these
- Version control
- Collaboration
- Issue tracking - for bug reports or feature requests
- Distribution - people can install your package directly from GitHub.
A fourth is that you can use GitHub actions. GitHub actions will perform some action on your repo. For example, the github action called “check-standard” will check the package works on the latest version of R on linux, macOS and Windows every time we push a commit. This is essential if you want your package to be released on CRAN, but useful anyway, as it can find problems that are not apparent on your own computer.
See the Biostats git and GitHub tutorial for how to make a GitHub repo for your package. To set up GitHub actions, just run the following command, then commit the files it generates and push.
usethis::use_github_action("check-standard")